Acc
March 2023
- Fundamentals of Sensing, Setting up devices
- 1. About your study
- 2. Accelerometer setup
- 2. Setting up the devices
- 3. Camera
- 3.1 software requirements
- 3.2 Camera operating instructions
- How should I wear the camera?
- When should I start wearing the camera?
- How long do I need to wear the camera for?
- How do I charge the camera?
- Should I wear the camera while sleeping?
- When should I NOT wear the camera?
- Does the camera record sound or conversations?
- Personal privacy
- Privacy of others
- Other ethical considerations
- Personal safety
- What are the possible disadvantages of collecting this data?
- Accelerometer
- 3.3 Collecting your own data in-the-wild
- 4. Camera image annotation
- 5. (Optional) Challenge: Cross-check your own annotations with others
Fundamentals of Sensing, Setting up devices
Overview
Over the next few days, you will be collecting and analysing your own physical activity data using two devices: a wearable camera and a wrist-mounted accelerometer.
By going through this practical, we hope that you will learn more about how innovative technologies such as wearable cameras and accelerometers are being used in health and social research. You might also find it interesting to see how many different activities you do in a day and where you spend the majority of your time.
Our road map for this week will be:
- Set up devices and collect your own data.
- Extract and annotate wearable camera data.
- Extract and annotate accelerometer data.
- Conduct time-series analysis, machine learning activity classification, and data visualisation.
Today
In this practical, we will set up your devices to collect data and learn how to annotate the camera images. By the end of the practical, you will be wearing your devices for one whole day until Practical 2, when you will begin analysis and visualisation of your very own data. Before you start, please download the practical materials that you will use for the rest of the week here. We will assume the practicals folder is placed in your home directory. If you don’t know where your home directory is, you can run echo $HOME in your Terminal to find out. You can move on to the next section if you get similar output by running ls ~/practicals:
(base) hangy@NDPH8334 ~ % ls ~/practicals
assets	data	scripts
1. About your study
The goal of these practicals is for you to create an n=1 study from your own dataset using the wearable camera and accelerometer. By going through this process, you will gain experience in the process of collecting and annotating accelerometer data for the training of machine learning activity classification models.
The text is chiefly about the wearable camera and has been adapted from an information sheet given to actual participants of the CAPTURE-24 study in 2015. Please take a moment to look through that foundational study.
Camera
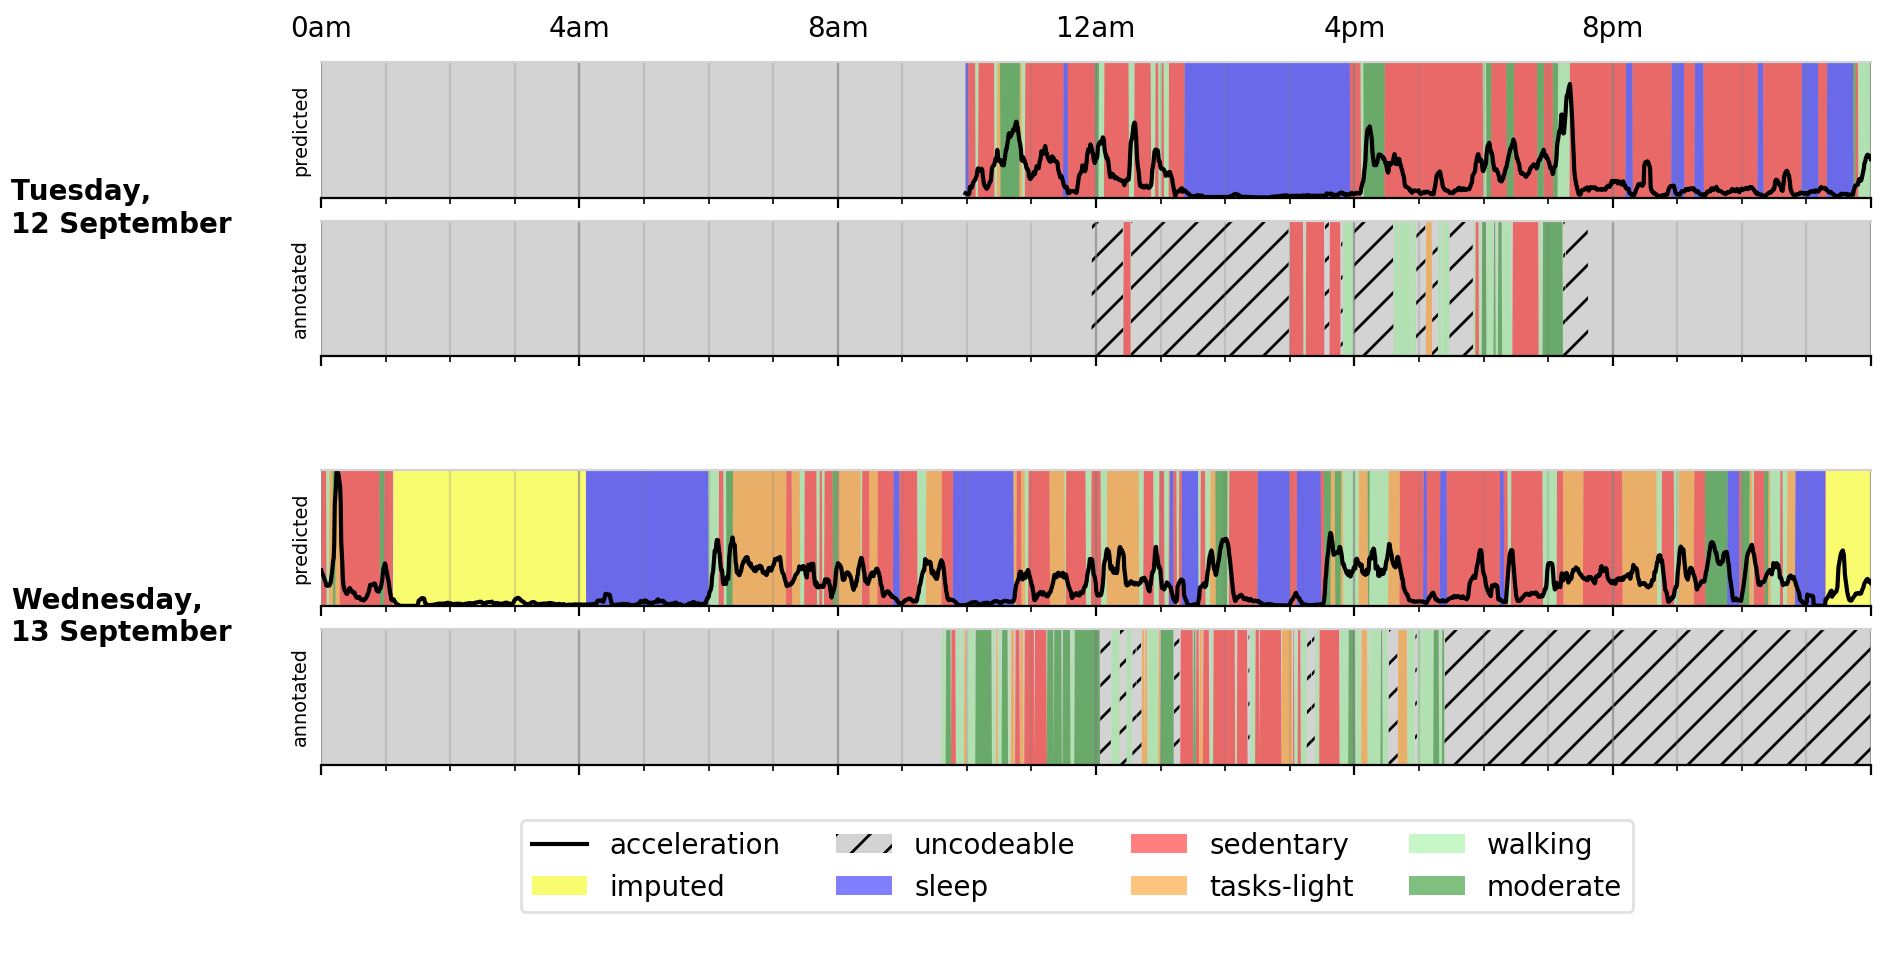
The wearable camera is designed to capture first-person perspective images to log participant behaviour and activity. This camera does not take video or audio, but captures still images approximately every 30 seconds. Annotation of accelerometer data with ground-truth images from a wearable camera is crucial for accurate annotation of accelerometer data and for understanding the activities a participant is involved in during the course of a day in preparation for classification model generation.
1.1 Camera
The camera is really helpful to get a better understanding of all the different activities you are involved in during the course of a day. The camera does not record continuously, but takes a photo every 30 seconds.

Disclaimer
- The camera does not record any sounds, voices or conversations.
- All images will be treated with the strictest confidence and you will be given the option to review and delete any or all images before analysis.
- Over the course of the data collection day you may forget you are wearing the camera and take images that are too personal, unwanted or unflattering. At the end of the period for which you are wearing the camera, you will have the opportunity to view and, if necessary, delete any images that you do not wish to be included in the study.
Ethics information on wearable cameras
The data collected will be anonymised and stored on a password-protected computer and any researchers using the data will have been trained in the ethical handling of such data. On a typical day of wear, the camera may take up to 3,000 images depicting your everyday life, where you go and the kinds of activities you engage in (e.g. walking to the shop, cycling, socialising). Some images are displayed below for you to get an idea of the content and quality of images that are recorded:
The devices are encrypted (‘scrambled’) so that the data can only be accessed by members of the research team. This restricts participants and/or third parties to access the images or make sense of them. Data of illegal activities may not be protected by confidentiality and may be passed to law enforcement. The camera does not record sound, voices, or conversations, so your privacy is assured in this regard.
It is important for you to understand that you are free to take off or pause the device at any time, without giving a reason. Pausing the camera for brief intervals throughout the day will not affect your input to the study. You should not feel obliged to wear the device in situations where wearing it may make you (or others) feel uncomfortable. If others around you feel uncomfortable with you wearing the camera, you should offer to remove or temporarily switch it off. Places where wearing the camera may not be appropriate include changing rooms, swimming pools, or in and around schools.
We recommend that you check in advance that friends, family, and co-workers understand the nature of the study and are happy for you to take part. Their behavior will not be reported as part of the research and images of them will never be shown without your and their written permission. They are welcome to contact the research team if they have any questions or concerns. If you are worried that the camera may have taken images of others that they would feel uncomfortable with, both you and the third party are free to request for those images to be deleted without giving any reason.
Over the course of the data collection day you may forget you are wearing the camera and take images that are too personal, unwanted or unflattering. At the end of the period for which you are wearing the camera, you will have the opportunity to view and, if necessary, delete any images that you do not wish to be included in the study.
1.2 Instructions
- Wear the camera for the rest of today and all of tomorrow. When you wear the camera tomorrow, make sure the camera is fully charged.
- Wear the camera for all activities, both at home and outside.
- You are free to take off or pause the device at any time, without giving a reason. However, please do put the device back on as soon as possible afterwards.
- Wear the camera around your neck so that it feels comfortable. The camera unit should be at chest height with the lens facing horizontally forwards.
- The height can be adjusted with the black cord (lanyard).
- Wear the camera outside of your clothes and be careful that your coat doesn’t obscure the lens!
- There is also a clip, if you prefer to attach the camera to clothes.
- Try not to get the camera wet.
- Make sure to charge the camera after you’ve used it for one day.
On a typical day of wear, the camera may take up to 3,000 images depicting your everyday life, where you go and the kinds of activities you engage in (e.g. walking to the shop, cycling, socialising). Some images are displayed below for you to get an idea of the content and quality of images that are recorded:
2. Accelerometer setup
The accelerometer is extremely robust and should be worn at all times. Do not worry if this is not a typical time for you (e.g. you are doing more or less physical activity than normal). Please start wearing it as soon as we give it to you. The accelerometer has a long battery life (at least a week), so you do not need to charge it. As it is completely silent, you will not be able to tell that it is running.
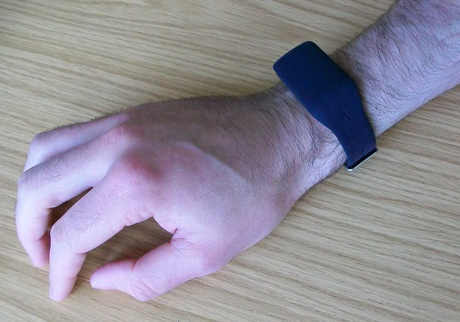
Please wear the accelerometer on the wrist of the hand that you usually use to write (i.e. your right wrist if you are right-handed). Generally this will be most convenient for people since it is typical to wear a watch on the other wrist. However, if for some reason you cannot wear the accelerometer on the wrist of the hand that you use to write, then please wear it on the other wrist. The heart-beat symbol should be on the inside of your wrist (i.e. facing towards you).
The accelerometer is robust and water-proof, and has been designed to be worn when working or sleeping, having a bath or shower, or playing all types of sport (including swimming). Extremes of temperature may damage the battery so it should be taken off while you have a sauna.
2. Setting up the devices
Collect your devices from Hang and Scott, who will go through the camera and accelerometer set-up with you. You should have been given 1 wearable camera (Vicon Autographer), 1 wrist-worn accelerometer, and 1 micro-USB cable.
2.1. Setting up the devices.
Now collect your devices from your tutor, who will go through the accelerometer set-up with you.
You will be given one wearable camera (Vicon Autograph), one wrist-worn accelerometer, and one micro-USB cable. For the Mac users, you can use the Open Movement website to try setup but it might not always work. For the Windows users, you can download OMGUI and follow the instructions. Note that you should pay attention to several key parameters which might be different from the setup manual:
- Change the sampling frequency to 100Hz and the +/- 8 g.
- Change the start date to today.
- Leave the rest to the default settings.
This web interface sometimes does not work. If that is the case, try someone else’s computer, or ask your tutor to help you set up on their machine. The local time of the accelerometer will be synced to the machine you set it up on.
3. Camera
3.1 software requirements
This week, you will use our group’s wearable camera browser. Here are the steps, including the installation of Node.js, to get up and running with it. For node, you can either download it using the link before or do brew install node on Mac or sudo apt install nodejs on Linux.
# 1. Download/clone this git repo
$ cd ~/
$ git clone https://github.com/activityMonitoring/oxford-wearable-camera-browser.git

# 2. Install npm package dependencies
$ cd oxford-wearable-camera-browser
$ npm install

# 3. Open/run browser
$ npm start
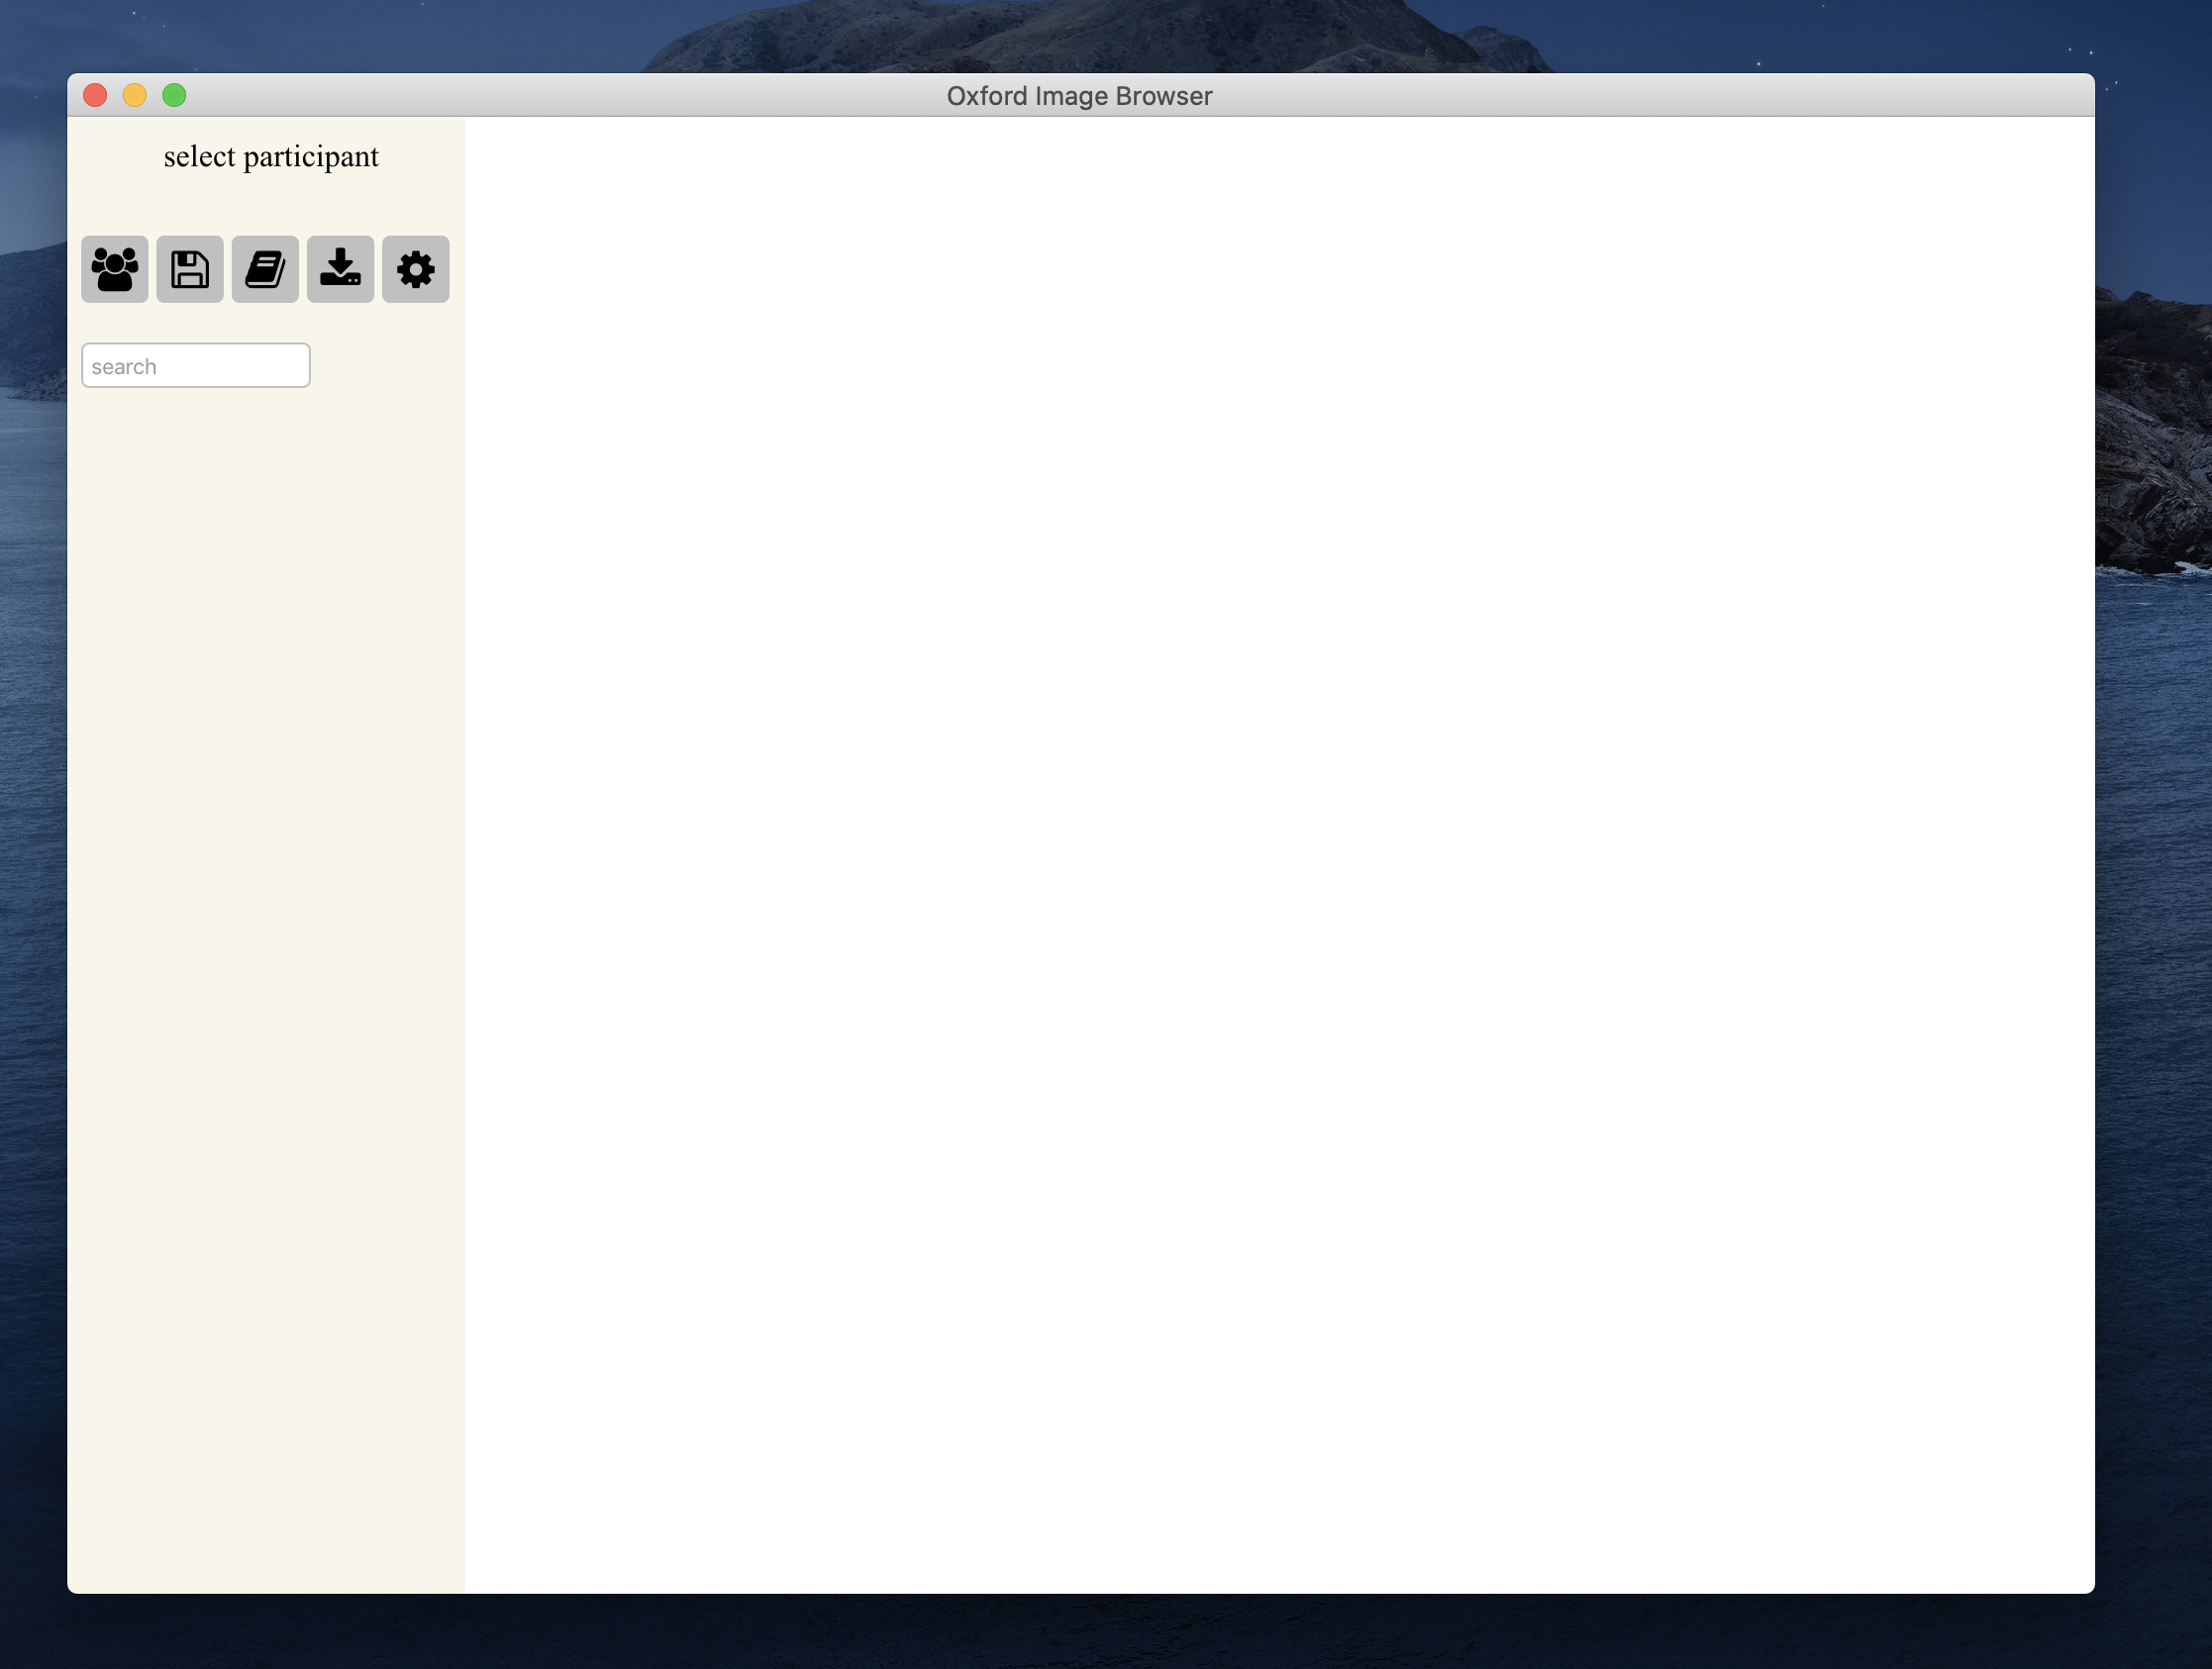
- Once it has been loaded properly you should see a window like this
- Hover your cursor over the different icons to familiarise yourself with the available functions.
Camera setup
To set up the camera, you will run a script to ensure the camera has a correct local time and that it does not contain any past data. The time syncing step is important for you to correctly align the accelerometer and camera data. The time syncing is based on your Mac’s local time - so it is expected to be in UK time and not to deviate too much from the time on Hang’s computer. You should also run the script as soon as your camera is plugged in to minimise any time lag.
Open your terminal and run these commands to set up your camera:
-
Within the oxford-wearable-camera-browser directory, navigate to the
utilitiesfolder. We will use the scriptautographer.pylocated inside this folder - see here for more instructions if needed. -
take a moment to install the a Python package
tqdmthat we will need today. You’re also expected to use Python 3.6. Open Terminal and run:
$ cd ~/oxford-wearable-camera-browser/utilities/
$ pip3 install tqdm
-
Plug in your camera to your Mac
- IMPORTANT: Run this immediately after the camera is plugged in
$ python3 practicals/scripts/autographer.py --setTime True - You can now safely unplug the device.
3.2 Camera operating instructions
| Action | Description |
|---|---|
| Turn on / off | Press the “ACTION” button to the side of the device for a few seconds. The screen will say ‘hello’/ ‘goodbye’. |
| Camera Status | Press the “MENU” button for an update on the battery status, number of pictures taken, and amount of memory space used. |
Turn the camera on, and check that only the screen below shows when pressing the ‘Menus’ button:
In a typical day of wear, the camera may take up to 3,000 images depicting your everyday life, where you go and the kinds of activities you engage in (e.g. walking to the shop, cycling, socialising). Some images are displayed below for you to get an idea of the content and quality of images that are recorded:
How should I wear the camera?
- Please wear the camera on a lanyard around your neck (or clipped to your clothing), with the camera unit at chest height and the lens facing horizontally forwards.
- Please do not give the camera to anyone else. Please keep it away from children and pets to avoid accidents.
When should I start wearing the camera?
- Please start wearing the camera as soon as you have set it up to begin recording.
How long do I need to wear the camera for?
We would like you to wear the camera for as long as possible during your waking hours, starting today and continuing through tomorrow (Tuesday) until bedtime (e.g., after showering in the morning until preparing for bed in the evening). Please continue doing your normal daily activities while wearing the camera.
How do I charge the camera?
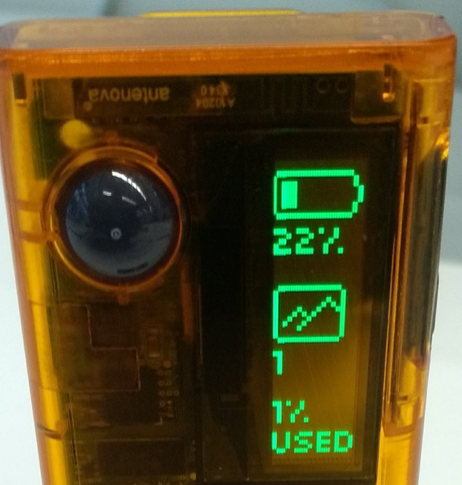
The camera will be fully charged before the practical, but we recommend checking its battery percentage at the start of each day. You do this by turning the camera on and pressing the “MENU” button to the side of the device. The battery percentage should then appear at the top of the display screen. If the battery percentage is <100%, please charge the camera using the yellow micro-USB cable provided.
Should I wear the camera while sleeping?
No, you should take the camera off just before preparing for bed in the evening.
When should I NOT wear the camera?
The camera is not waterproof, so please remove it during water-based activities (e.g., swimming). For safety reasons, please also remove the camera if operating machinery. It is important for you to understand that you are free to take off or pause the device at any time, without giving a reason. Pausing the camera for brief intervals throughout the day will not affect your input to the study. You should not feel obliged to wear the device in situations where wearing it may make you (or others) feel uncomfortable. If others around you feel uncomfortable with you wearing the camera, you should offer to remove or temporarily switch it off. Places where wearing the camera may not be appropriate include changing rooms, swimming pools, or in and around schools. We appreciate that in some places (e.g. hospitals or airports) it may not be appropriate to wear the camera and you should feel free to remove it at any time. You do not need to wear the camera while participating in contact or water based sports (e.g. rugby or swimming), although we would like you to record your journey there and back.
Does the camera record sound or conversations?
The camera captures images automatically every 20-120 seconds but does not record sound or conversations. The camera has a wide-angle lens, so if worn at chest height, it captures everything within the wearer’s view.
Personal privacy
- The camera has a privacy lens which allows the wearer to pause image recording. You can remove the camera or stop/pause recording at any time if you are feeling uncomfortable. Some people find it easier to hide the camera under their clothing or in a pocket for short periods of privacy.
- The camera will be encrypted so that only the research team can download and view your images.
- Over the course of the data collection day you may forget you are wearing the camera and take images that are too personal, unwanted or unflattering. At the end of the period for which you are wearing the camera, you will have the opportunity to view and, if necessary, delete any images that you do not wish to be included in the study.
- All images will be treated with the strictest confidence and you will be given the option to review and delete any or all images before analysis.
Privacy of others
We recommend that you check in advance that friends, family, and co-workers understand the nature of the study and are happy for you to take part. Their behavior will not be reported as part of the research and images of them will never be shown without your and their written permission. They are welcome to contact the research team if they have any questions or concerns. If you are worried that the camera may have taken images of others that they would feel uncomfortable with, both you and the third party are free to request for those images to be deleted without giving any reason.
- Please seek verbal permission prior to wearing the camera in someone’s home, whether it is a family member, cohabitant, friend, or acquaintance.
- Please seek verbal permission from your manager/supervisor prior to wearing the camera at work. Also, please inform direct co-workers about the camera and remove it if they ask you to.
- Please remove the camera if you find yourself recording strangers in places where privacy might reasonably be expected (e.g., a changing room, swimming pool, school, bank, hospital, or airport) or where photography is disapproved of or considered inappropriate (e.g., certain church communities).
Other ethical considerations
The devices are encrypted (‘scrambled’) so that the data can only be accessed by members of the research team. This restricts participants and/or third parties to access the images or make sense of them. Data of illegal activities may not be protected by confidentiality and may be passed to law enforcement.
Personal safety
Remove the camera in any situation where you feel unsafe. For example, if you happen to be out on your own late at night, you may prefer to hide the camera to avoid unwanted attention. If someone tries to take the camera off you, do not attempt to stop them.
If you are engaged in certain manual tasks or using machinery the camera sometimes swings around. For example, if you are using gardening machinery, we advise you remove the device until the activity is finished to avoid discomfort or the possibility of the device getting caught in a dangerous way.
What are the possible disadvantages of collecting this data?
We do not anticipate any significant effects on your lifestyle. You will also be able to check and delete any images taken prior to anyone viewing the images. However, it is possible that while wearing the camera you may be asked about the device by members of the public. In this case we suggest that you say the following:
“I am volunteering for a research project. The device is a wearable camera and the images will be used to record my daily activities. I am happy to remove it if you would like me to.”
You may also print out a wallet-size card which includes this statement and contact information for you to show others.
Accelerometer
To set up the Axivity AX3 accelerometers, we will use the OpenMovement setup interface. For the Mac users, the Open Movement website is available for device setup. This interface is slightly unstable and might not always work. If that is the case, try someone else’s computer, or Scott or Hang will help you set up on their machines.
For the Windows users, you can download OMGUI and follow the instructions in the practicals/prac1-deviceSetup/accSetup.pdf.
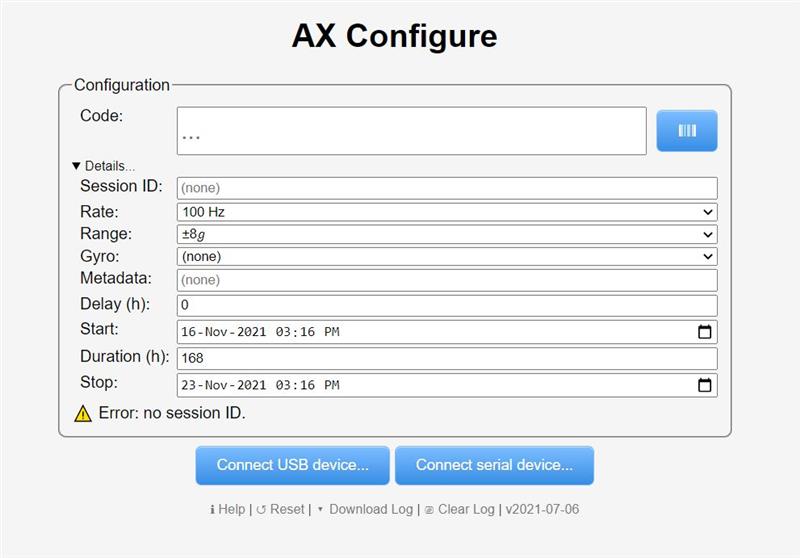
A few key features we need to pay attention to during accelerometer setup are the accelerometer sampling rate and the accelerometer’s dynamic range. Setting the sampling rate dictates the number of data points collected by the accelerometer per second. The dynamic range dictages the overall sensitivity of the accelerometer’s measurements. On a Mac, using the https://config.openmovement.dev/ setup page, set the sampling rate to 100 Hz and the dynamic range to +/- 8 g. The AX3 has no gyroscope, so leave the “Gyro” setting set to “None”.
In the web interface you are able to program the AX3 to begin recording at any desired timepoint. To begin recording immediately, set the start in the next few moments. You can set the duration for a specific number of hours, or leave the duration at the default 168 hours to ensure you are recording acceleration from the accelerometer for the entire time you will be completing your study. When configuring that accelerometer, the local time of the accelerometer will be synced to the machine you set it up on. As it is completely silent, you will not be able to tell that it is running.
Please start wearing the accelerometer as soon as you have set up to begin recording. During your data collection this week, please wear the accelerometer on the wrist of the hand that you usually use to write (i.e. your right wrist if you are right-handed). Generally this will be most convenient for people since it is typical to wear a watch on the other wrist. However, if for some reason you cannot wear the accelerometer on the wrist of the hand that you use to write, then please wear it on the other wrist. To correctly align the accelerometer axes, the triangle (arrow) marking on the device should be lined up with the triangle (arrow) marking on the inside of the wrist strap. When wearing the wrist strap, the heart-beat symbol should be on the inside of your wrist (i.e. facing towards you).

3.3 Collecting your own data in-the-wild
Now that you’ve set up the devices, you can go ahead with your day as normal to collect data! Please wear your devices for the rest of today and all day tomorrow, following which you will begin analysis and visualisation of your very own data!
4. Camera image annotation
In this section, you will learn how to process the camera data using a reference dataset. Your tutor will provide you with the reference camera images.
4.1 Setup and installation
Navigate to the oxford-wearable-camera-browser folder that you installed in the previous section.
Folder structure
We will now walk through how the browser reads in the images for annotation. Our setup has created a new directory in your root folder at /Users/{yourName}/OxfordImageBrowser/, this further contains 3 folders: annotations,images, schema.
-
images/This is where you store images which you want to annotate. You should have a folder structure like this. You should move the reference images to the
imagesfolder with a similar directory structure./Users/<yourName>/OxfordImageBrowser/images/ participantID/ AAAAAAAAA_BBBBBB_YYYYMMDD_HHMMSSE.JPG ... -
schema/This is where you will store csv files which specify your annotation schemes.
You should have 3 schema .csv files (7class, annotation, social), along with a template for free text annotation. For the purpose of these practicals, do not edit any of these files except for
free_text.csv.Should you want to define your own schema, simply copy one of the existing ones and add/remove rows as you see fit. You can use either a text editor (Notepad), or Excel. If using Excel make sure to save as .csv filetype, as .xls files will not be recognised.
Your annotation training will focus on the schema
annotation.csv, which is a specific set of activities based on the Compendium of Physical Activities. Have a browse at this file to check the available activity annotations. You should move the schema you want to use intoOxfordImageBrowser/schema. Template schema files can be found atpracticals/assets/schema. -
annotation/This is where the Browser outputs your annotation files by default. A sub-folder will be created for each participant found in
images/.
4.2 Annotating a reference dataset
Now you can open OxfordImageBrowser and annotate the reference data.
- Start the image browser.
$ cd ~/Development/oxford-wearable-camera-browser/
$ npm start
-
Click on the leftmost participant selection icon. You should see it reflecting the updated list of test participants.
-
For each participant:
-
Select the participant.
-
Select the annotation scheme
annotation.csv -
Annotate all images belonging to the participant (see instructions just below)
-
When finished, check the top bar to ensure annotation is 100% complete.
-
Check that the annotation CSV file has been automatically saved to the default location (inside
~/OxfordImageBrowser/annotations/<your_name>/); If not, manually save the annotations by clicking the download button.
-
Annotating images.
All previous annotators of the CAPTURE-24 dataset had to go through extensive training - annotating at least 8 test subjects - before they can go on to annotate other data. We will not subject you to that experience! However, today you will get a taste of this by annotating your own data. To start with, please go through parts C & D of this supplementary document from this paper to understand how you should annotate the images.
The overall flow is described in great detail here where the essential elements are to:
-
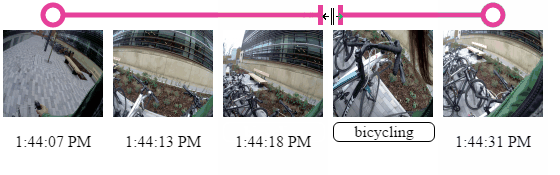
Divide up the images into different events/activities by clicking on the timeline above the images: I) To move event boundaries, click and drag the circles. II) For instance this split is where I think the participant has started locking up their bike.
-
Look at consecutive images to determine the most suitable annotation for each image sub-sequence. You can also make use of the search bar if you are unsure where the annotations are located in the hierarchy.
-
Pull the selected annotation onto the image(s). To change an activity annotation simply drag another annotation over it.
After annotating the data using the scheme annotation.csv, please perform the following annotation exercises.
-
social.csv: annotate events which you think are of a social nature (e.g. having lunch with friends) versus those which are not. This schema may install as a blank .csv. To fix this, open the social.csv file and add your own categories. For example, social, non-social, social-with-one, social-with-2plus, etc. -
free_text.csv: In the previous exercises, you have been confined by the definition of the annotations to define ‘events’ / ‘activities’. In this case, could you come up with your own description or annotations and divide up the image timeline according to what feels most natural to you? You would need to put your event annotations / descriptions into a CSV file, and drag these to annotate your events. The currentfree_text.csvhas been provided as an example but be creative. -
Write a 1-liner summary for each day. Save this as a
per_day.csvfile where you have one line per row. Divide up your time line
At the end of these exercises, you should have 4 annotation CSV files saved in your OxfordImageBrowser/annotation/me directory.
Copy the my-annotations.csv file over to your ~/practicals/data/ folder.
4.3 Extracting data
We now want to extract the raw images from your camera. We’ll perform the following from the utilities folder within oxford-wearable-camera-browser.
- Plug in your camera. To download the photos:
$ cd ~/oxford-wearable-camera-browser/utilities/
$ python3 autographer.py --download True --destDir ~/OxfordImageBrowser/images/<your_name>
-
Safely disconnect the device and put your camera back on!
-
Then generate resized versions of your photos. You first need to install ‘imagemagick’ via Homebrew (installation instructions for Homebrew here).
$ brew install imagemagick
Then to resize: (this could take about 10 minutes to run)
$ bash create_thumbnails.sh ~/OxfordImageBrowser/images/<your_name>/
5. (Optional) Challenge: Cross-check your own annotations with others
Try to understand if you can use this to compare your annotations with another student. To run this script, you will first need to install four depedencies:
$ pip3 install argparse
$ pip3 install numpy
$ pip3 install pandas
$ pip3 install -U scikit-learn
Then generate the list of image file names in this format and store this as cdt-fileList.txt under the ~/oxford-wearable-camera-browser/training folder. Move your own annotation to the same place and rename it as cdt-ref.csv.
Now go a get another annotation file from your friend, you can run the comparison script via:
$ python kappaScoring.py /..path../annotation.csv
To generate the file list, you can use this Python script:
import os
import glob

path2gen = '/Users/hangy/plots'
file_list = glob.glob(os.path.join(path2gen, '*.JPG'))

with open('file.txt', 'w') as f:
    for item in file_list:
        txt2write = item.split('/')[-1]
        print(txt2write)
        f.write("%s\n" % txt2write)
When you are done, let your tutor know what your kappa score is.